martes, 23 de junio de 2026

Upgrading Fedora Remix for WSL from 42 to 43: A Deep-Dive Adventure 🚀


Upgrading a specialized downstream Linux distribution inside Windows Subsystem for Linux (WSL2) is never quite as simple as a standard dnf system-upgrade. If you use Fedora Remix for WSL, running raw upstream commands can break your Windows-interoperability hooks or brick your repository maps.
Here is the exact breakdown of why we chose our target version, how we navigated a cross-version migration, wrestled with the new DNF5 architecture, and came out on top with a screaming fast development environment!

🧐 The Big Choice: Why Remix 43 Instead of Fedora 44?
When looking at the Windows Store or official downloads, it is tempting to jump straight to the brand-new Fedora 44. However, for a streamlined Windows development environment, Fedora Remix for WSL 43 is a vastly superior choice over stock Fedora 44 for several reasons:
  • Native Windows Interoperability: Fedora Remix comes pre-baked with the wslu toolset. Out of the box, you get smooth integration with the Windows clipboard (wslclip), native Windows paths, and short-cuts. On stock Fedora 44, you have to engineer these connections yourself.
  • The Wayland vs. X11 Dilemma: Fedora 44 completely dropped legacy X11/Xorg support from GNOME, committing 100% to Wayland. Because WSLg and Windows integration environments still rely heavily on X11 server protocols to map Linux graphics natively onto your Windows monitor, stock Fedora 44 introduces major graphical stability risks. Remix 43 is pinned and rigorously tested to ensure Windows updates won't break your environment.
  • Day-to-Day Freshness: While the base system architecture of Remix lags slightly behind upstream, running sudo dnf upgrade --refresh pulls the absolute newest packages directly from the Fedora Project streams anyway. You get the stability of the Remix engine with the cutting-edge tools of Fedora.

🛑 The Core Problem: The systemd Trap & Custom Repos
Upstream Fedora relies on offline reboots to apply system upgrades. In a WSL environment, trying to trigger an offline reboot can loop or crash.
Furthermore, Fedora Remix explicitly warns: "Do not perform the upgrade with systemd active; it will ruin your installation."

🛠️ Our Battle Blueprint: Step-by-Step Success
Here is the battle-tested roadmap we used to upgrade safely without losing our custom Whitewater Foundry features:
1. Disabling the Init Engine
Before running any migration tools, we had to temporarily bypass systemd inside /etc/wsl.conf to prevent package scriptlets from crashing or wiping out our environmental configurations:
ini
[boot]
systemd=false

A quick wsl --shutdown via Windows PowerShell forced a clean, systemd-free baseline.
2. The DNF5 Repository Reset
During the live synchronization (dnf distro-sync), the package database successfully leaped to version 43, but it dropped its identity packets, temporarily labeling our OS as a hilarious "Generic Release" referencing Zombo.com and The Beatles in the system metadata!
To fix this, we had to navigate Fedora’s brand new DNF5 engine syntax to force-enable our core package streams back on:
bash
sudo dnf config-manager setopt fedora.enabled=1 updates.enabled=1
sudo dnf clean all

3. Restoring the Identity & Toolchain
With the core mirrors unlocked, we manually injected the official Fedora Remix v43 metadata block back into /etc/os-release and fetched our essential engineering utilities.

⚠️ Pro-Tip Troubleshooting Guide
If you try this upgrade yourself, you are highly likely to hit these two classic WSL pitfalls. Save these commands!
🚨 Pitfall 1: Curl error (35): SSL connect error
During the upgrade, DNF might suddenly block all downloads, claiming it cannot verify secure HTTPS certificates.
  • The Cause: When upgrading system files with systemd disabled, the WSL2 background clock can fall out of sync with your Windows host clock by just a few seconds, completely shattering SSL handshakes.
  • The Fix: Force your Linux hardware clock to instantly re-align with Windows by running:
    bash
    sudo hwclock --hctosys
🚨 Pitfall 2: Unknown argument "--set-enabled"
If you try to use old Fedora forum guides to fix your repositories, your terminal will throw a syntax error.
  • The Cause: Fedora 43 upgrades your package manager to DNF5, which completely removes the old config flags.
  • The Fix: Switch to the new DNF5 key-value configuration syntax:
    bash
    sudo dnf config-manager setopt <repo_name>.enabled=1
    
🏆 The Final Verdict: Upgraded & Verified!
After re-enabling systemd=true and performing a cold reboot, our workspace emerged fully optimized. We verified our environment using automated terminal health checkers and checked our Windows interoperability bridges via native clipboard integrations (wslclip).
We are officially up and running on a cutting-edge, ultra-stable environment boasting:
  • OS: Fedora Remix for WSL 43 🐧
  • Package Manager: DNF5 (v5.2.18) ⚡
  • Python Runtime: Python 3.14.5 🐍
  • Compiler Engine: GCC 15.2.1 🛠️
  • Version Control: Git 2.54.0 📦
Have you upgraded your WSL workspace to Fedora 43 yet? Let me know in the comments below if you ran into the same repository quirks!

sábado, 6 de junio de 2026

How to Fix RHEL 8 "Status Code 400" YUM Update Error on Azure

If you are running a Red Hat Enterprise Linux (RHEL) 8 virtual machine on Microsoft Azure, you may occasionally run into a disruptive error when executing your standard security updates.
The system will report that it is not registered with an entitlement server and will fail to download critical metadata from the Red Hat Update Infrastructure (RHUI) server, throwing an HTTP Status Code 400. [1, 2]
This step-by-step guide explains how to quickly resolve this mirror issue and get your regular updates working again.

The Problem
When running sudo yum update --security, the process halts with an output that looks like this:
text
sudo yum update --security
Updating Subscription Management repositories.
Unable to read consumer identity

This system is not registered with an entitlement server. You can use subscription-manager to register.

Red Hat Enterprise Linux 8 for x86_64 - BaseOS from RHUI (RPMs)                         140  B/s | 215  B     00:01
Errors during downloading metadata for repository 'rhel-8-for-x86_64-baseos-rhui-rpms':
  - Status code: 400 for https://rhui4-1.microsoft.com/pulp/repos/content/dist/rhel8/rhui/8/x86_64/baseos/os/repodata/repomd.xml (IP: 20.225.226.182)
Error: Failed to download metadata for repo 'rhel-8-for-x86_64-baseos-rhui-rpms': Cannot download repomd.xml: Cannot download repodata/repomd.xml: All mirrors were tried
This error usually indicates that your local cache is corrupted or your Azure RHUI client package needs to force-refresh its configuration with the Microsoft update repositories.

The Solution
You do not need to register with a standard Red Hat Subscription Manager if you are using an Azure Pay-As-You-Go (PAYG) image. Instead, execute the following commands in your terminal to fix the repository mappings:
1. Clean the YUM Cache [1]
First, wipe all cached data and tracking cookies from your package manager to eliminate corrupted repository metadata:
bash
sudo yum clean all
2. Re-install/Update the Azure RHUI Package [1]
Force YUM to bypass other broken repositories, look specifically for Microsoft-related configurations, and update the Azure-RHEL8 infrastructure client:
bash
sudo yum update -y --disablerepo="*" --enablerepo="*microsoft*" rhui-azure-rhel8
3. Run Security Updates Again
With the client configuration corrected, your standard security updates will now function perfectly:
bash
sudo yum update --security
Conclusion
Your RHEL 8 environment on Azure should now pull packages seamlessly from the updated mirror endpoints!
Found this fix helpful? Save it to your bookmarks and share it with your fellow Linux Administrators!

miércoles, 8 de abril de 2026

Cómo forzar actualizaciones de Firmware (UEFI dbx) en Fedora con batería agotada

¿Tu batería no carga y no puedes actualizar el firmware en Fedora? Aprende a solucionar el error 'System power is too low' forzando fwupdmgr para actualizar UEFI dbx y KEK CA de forma segura."


Si eres usuario de Fedora (o cualquier distro Linux que use fwupd) y tu laptop tiene la batería dañada o ya no carga, es muy probable que te hayas topado con este molesto error al intentar actualizar el sistema:
“System power is too low” o “La energía del sistema es demasiado baja”
Este mensaje suele aparecer específicamente al intentar actualizar la lista de firmas prohibidas de Secure Boot (dbx) o el KEK CA. El sistema bloquea la actualización por seguridad, para evitar que el equipo se apague en medio de un cambio crítico de firmware, lo que podría dejar tu computadora inservible.
Pero, ¿qué pasa si tu batería ya no funciona y siempre usas la corriente? Aquí te enseño cómo saltarte este bloqueo de forma manual.

Paso 1: El intento fallido con la terminal

Normalmente, intentaríamos forzarlo con el comando estándar:
sudo fwupdmgr update --force
Si el sistema sigue respondiendo que la energía es insuficiente, significa que el demonio interno de fwupd tiene una protección que ignora incluso el comando --force.

Paso 2: Modificar la configuración de fwupd

Para solucionar esto, debemos decirle al sistema que ignore el estado de la batería manualmente.
  1. Abre una terminal y edita el archivo de configuración global:
    sudo nano /etc/fwupd/fwupd.conf
    
  2. Busca la sección [fwupd] y localiza la línea que dice IgnorePower=false.
  3. Cambia el valor a true:
    IgnorePower=true
    
  4. Guarda los cambios (Ctrl + O, luego Enter) y sal (Ctrl + X).

Paso 3: Reiniciar el servicio y aplicar

Para que Fedora reconozca el cambio, reinicia el servicio y lanza la actualización de nuevo:
sudo systemctl restart fwupd
sudo fwupdmgr update
¡Listo! Ahora las actualizaciones de UEFI dbx y KEK CA deberían procesarse sin quejarse del nivel de carga.

Paso 4: ¿Cómo verificar si se aplicó correctamente?

Una vez que el proceso termine (y si el sistema te pidió reiniciar), puedes verificar que todo esté al día con este comando:
fwupdmgr get-updates
Si el sistema está parcheado correctamente, verás el mensaje: "Devices with no available firmware updates". También puedes listar los dispositivos actuales y sus versiones con:
fwupdmgr get-devices
Busca la sección UEFI dbx; debería mostrar la versión más reciente y no tener mensajes de error pendientes.

¿Por qué es importante esta actualización?

No la ignores. Estas actualizaciones corrigen vulnerabilidades críticas (como las de los bootloaders IGEL o SysReturn) que permiten a un atacante saltarse el Secure Boot. Mantener el "dbx" al día garantiza que tu equipo solo arranque software confiable y firmado digitalmente.
⚠️ Nota de seguridad: Una vez que termines, te recomiendo volver a ponerloIgnorePower=false en el archivo de configuración. Es una protección útil para evitar "brickear" (dejar inservible) tu main board (placa base) si llegaras a desconectar el cable por accidente en futuras actualizaciones de BIOS.

¿Te sirvió este truco? ¡Déjame un comentario si tuviste algún problema con tu modelo de laptop!


sábado, 14 de febrero de 2026

📝 Winget upgrade vs winget update: ¿cuál es la diferencia y cómo bloquear actualizaciones con pins?

Cuando administramos aplicaciones en Windows, WinGet se ha convertido en una herramienta fundamental para instalar, actualizar y mantener software desde la línea de comandos. Sin embargo, aún genera confusión la diferencia entre winget upgrade y winget update, así como el uso del comando winget pin para evitar que ciertos programas se actualicen automáticamente.

En esta entrada te explico estas diferencias y te muestro un ejemplo real de cómo bloquear un programa para que no se actualice, utilizando blocking pins.


🔄 ¿Cuál es la diferencia entre winget upgrade y winget update?

Según la documentación oficial, update no es un comando diferente, sino un alias de upgrade. Esto significa que:

➡️ winget update = winget upgrade\ Ambos realizan exactamente la misma acción: actualizar aplicaciones. [learn.microsoft.com], [github.com]

Por lo tanto, cualquier comando que ejecutes con upgrade funcionará igualmente con update, incluyendo parámetros como --all, --silent, --include-unknown, etc.


🔒 Cómo funciona el pinning en WinGet

WinGet permite “anclar” paquetes para controlar si pueden o no ser actualizados:

Tipos de pin:

  1. Pinning\ Excluye al paquete de winget upgrade --all, pero permite actualizarlo manualmente. [learn.microsoft.com]

  2. Blocking\ Bloquea completamente la actualización, incluso si se intenta actualizar el paquete directamente.\ Requiere eliminar el pin o usar --force para sobrescribirlo. [learn.microsoft.com]

  3. Gating\ Permite actualizaciones solo dentro de un rango de versiones definido. [learn.microsoft.com]

En este post nos enfocaremos en blocking, ideal cuando quieres impedir que un programa sea actualizado bajo cualquier circunstancia.


🛑 Ejemplo práctico: bloquear MobaXterm para que no se actualice

A continuación tienes un ejemplo real ejecutado con WinGet, usando un prompt tradicional tipo:

c:\WinUser>

📌 1. Ver qué paquetes están actualmente anclados (pins)

c:\WinUser> winget pin list
Nombre    Id                Versión        Origen Tipo de anclaje
-----------------------------------------------------------------
MobaXterm Mobatek.MobaXterm 25.0.0    winget Pinning

📌 2. Quitar el pin existente

c:\WinUser> winget pin remove Mobatek.MobaXterm
Encontrado MobaXterm [Mobatek.MobaXterm]
El anclaje se quitó correctamente

📌 3. Crear un pin blocking para impedir actualizaciones

c:\WinUser> winget pin add Mobatek.MobaXterm --blocking
Encontrado MobaXterm [Mobatek.MobaXterm]
Anclaje agregado correctamente

📌 4. Verificación final

c:\WinUser> winget pin list
Nombre    Id                Versión        Origen Tipo de anclaje
-----------------------------------------------------------------
MobaXterm Mobatek.MobaXterm 24.2.0.5220    winget Blocking

Ahora MobaXterm no se actualizará automáticamente, ni con winget upgrade --all ni con winget upgrade Mobatek.MobaXterm, a menos que lo fuerces manualmente o elimines el pin.


✅ Conclusión

  • winget update y winget upgrade son lo mismo: update es solo un alias. [learn.microsoft.com]
  • Puedes usar winget pin para evitar que una aplicación se actualice.
  • El tipo blocking es útil para software corporativo, herramientas críticas o versiones específicas que deseas mantener estables. [learn.microsoft.com]

sábado, 6 de mayo de 2023

Pinning apps using winget

Some times you want to update all your packages on your windows system, winget can be a solution, but sometimes all thinks can be out of control, you can try this way to skip certain updates over winget commands.

Recently on winget unstable version  of winget got the excellent feature and its called pin programs.

This is a useful tools in order to run in a relaxed way the famous update "winget update --all"  and does not stuck your system in a little moment.

This treat shows how winget will works:

Pin a package · Issue #476 · microsoft/winget-cli (github.com)


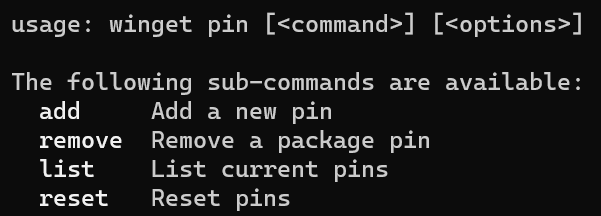
I installed the April unstable release of winget and it seems the this version uses the operations: add, remove, list, reset, showed as follows:


To add a program for pined version just type as follows:


To ensure the package is fully pined, you can try:


And will show your current pinned programs:


If you want to delete or remove this pin, you can try:


Finally, if you want reset all pines you can do it just typing:


Enjoy and Cheers!!

martes, 8 de noviembre de 2022

Fedora y la tapa del ordenador

 He notado que fedora no trae la opción de los equipos Ubuntu en energia para configurar el comportamiento al cerrar la tapa de energia en el portatil.


En este documento de redhat se explica como cambiar las opciones cuando se cierra la tapa, entre las cuales tenemos:


No hacer nada --> ignore

Suspender -> suspend

Bloquear la pantalla -> lock


Lo que nos suguieren es editar el fichero:


/etc/systemd/logind.conf


Por ejemplo:

[Login]
HandleLidSwitch=lock

y reiniciar el servicio ( es posible que la sesión actual de X se pierda luego de hacer los cambios y un reinicio completo sea necesario) .


systemctl restart systemd-logind.service

sábado, 13 de agosto de 2022

Como Instalar VirtualBox 6.1 y firmar los modulos del kernel fedora 35 y 36

Cuando requeria ejecutar Virtualbox en un sistema fedora, la única opción viable era  deshabilitar la opción de secureboot en equipo, hasta hace poco, siempre existía la necesidad de firmar los drivers de virtualbox, pero esto no era posible o no había encontrado como hasta ahora.


En esta página se explica el proceso detalladamente. Básicamente los pasos son los siguientes:


Preparar el sistema Fedora:

Pasarnos a modo super usuario

#sudo -i

Ejecutar actualizaciones y limpieza del sistema:

#dnf -y update && dnf -y upgrade && dnf -y autoremove

Instalar cabecéras del kernel y módulos de desarrollo:

#dnf install -y kernel-devel-$(uname -r) kernel-headers

Habilitar los repositorios:


Pasarnos a super usuario

#sudo -i 

Importar la firma de Oracle VirtualBox en nuestros RPM

#rpm --import  https://www.virtualbox.org/download/oracle_vbox.asc
 
Agregar el Repositorio oficial VirtualBox vía DNF:

#dnf config-manager --add-repo https://download.virtualbox.org/virtualbox/rpm/fedora/virtualbox.repo

Instalar VirtualBox en Fedora 36

Instalamos VirtualBox vía DNF

#dnf install -y VirtualBox-6.1

regresar al usuario sin privilegios y ejecutar 

#exit

sudo agregar al usuario normal al grupo vboxusers

#sudo  usermod -aG vboxusers $USER

#sudo -i

Preparar el sistema para firmar los drivers en los sistemas EFI con SecureBoot habilitado

Generar el Machine Owner Key MOK

Instalar OpenSSL
#dnf install -y openssl

Crear el directorio para nuestros módulos:

#mkdir /root/module-signing
#cd /root/module-signing

Crear la llave de la máquina (yo usé hostname) pero ese campo CN se puede personalizar a su gusto:

#openssl req -new -x509 -newkey rsa:2048 -keyout MOK.priv -outform DER -out MOK.der -nodes -days 36500 -subj "/CN=$(hostname)/"

Proteger la llave creada

#chmod 600 MOK.priv
 

Ahora vamos a importar la llave generada con la utilidad mokutil, debemos colocar contraseña y reiniciar, esto nos dirigirá a la BIOS donde debemos completar el proceso de importación, colocando la contraseña asignada en este paso.

#mokutil --import /root/module-signing/MOK.der

Al reiniciar presionamos Enter

1. Seleccionamos la opción Enrolar/Inscribir MOK
2. Seleccionamos la opcion View Key 0 (Ver llave 0) para revisar el Machine Owner, si la información es correcta, continuamos.
3. Elegimos continuar y damos la opción YES (si), en seguida se solicita la contraseña que le asingamos a la llave.
4. Reiniciamos el sistema.


Con este MOK agregado a la BIOS nos permitirá firmar nuestros drivers de VirtualBox y así completar el proceso:

creamos el script /root/module-signing/sign-vbox-modules

Nos pasamos a Root:

#sudo -i

Creamos el script con el comando echo.

# echo "
#!/bin/bash

for modfile in $(dirname $(modinfo -n vboxdrv))/*.ko; do
  echo "Signing $modfile"
  /usr/src/kernels/$(uname -r)/scripts/sign-file sha256 \
                                /root/module-signing/MOK.priv \
                                /root/module-signing/MOK.der "$modfile"
done
" > /root/module-signing/sign-vbox-modules

Luego de esto Protegemos el script

#chmod 700 /root/module-signing/sign-vbox-modules

Ahora podemos ejecutar el script:

#/root/module-signing/sign-vbox-modules

Con los drivers firmados podemos habilitar nuestro sistema VirtualBox

#systemctl enable --now vboxdrv


Habilitar las Extensiones de VirtualBox


Descargamos las extensiones:

#wget https://download.virtualbox.org/virtualbox/6.1.34/Oracle_VM_VirtualBox_Extension_Pack-6.1.34.vbox-extpack

Las agregamos al sistema Instalado y Habilitado

#VBoxManage extpack install Oracle_VM_VirtualBox_Extension_Pack-6.1.34.vbox-extpack


Y así podemos ya Instalar nuestros sismemas de pruebas con VirtualBox en Fedora 35 - 36


Un saludo.